Making Exhaust Gaskets
A common problem especially with older cars is finding the correct gasket. Some popular models such as MGs and Triumphs are well catered for but owners of less popular cars especially Vintage and PVT can struggle to find anything suitable. Paper gaskets as used extensively throughout engines and transmissions etc. can be made easily as the gasket material is easily cut but exhaust gaskets pose rather more of a problem. Gasket material suitable for high temperatures is now readily available although for Vintage and similar cars copper would be visually more acceptable but is not that easy to fabricate without special equipment. This more modern material will do the job and as it is hidden from view could be an acceptable alternative.
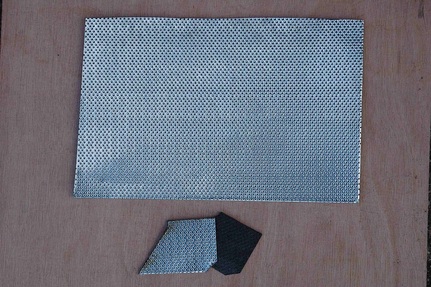
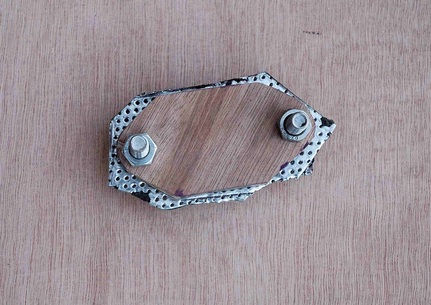
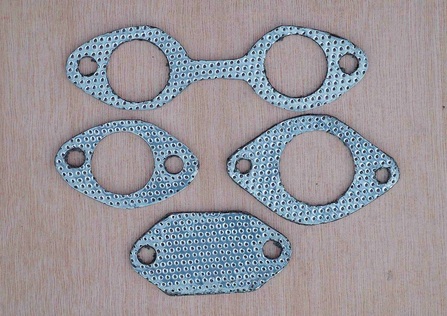
A typical piece of the material is illustrated and comprises an inner layer of soft heatproof fabric sandwiched between outer layers of thin perforated steel. The layers will separate quite easily as shown and this can cause problems when trying to make gaskets.
It is suggested that the material can easily be cut with tin snips and the holes drilled by clamping the material between thin wooden boards. I found that although this advice is true rather more care is needed to produce acceptable results. After several unsuccessful attempts I found the following method worked well.
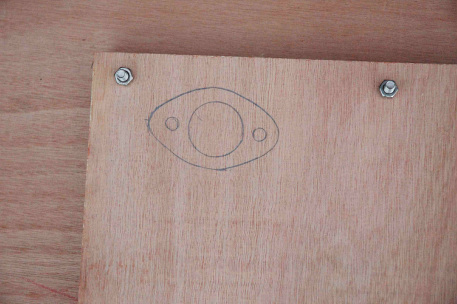
1. Two plywood boards (I used 8mm) are initially cut to clamp the gasket material and bolted securely. The The old gasket is then used to trace an image onto the plywood. Care at this stage especially regarding the position and size of the holes will pay dividends.
The mounting holes can then be drilled. By sandwiching the gasket material between the ply the material is prevented from separating and clean holes are formed. Next the large port hole needs to be cut. I used a decent bi-metallic hole-saw in a battery drill, again the ply supports the material and prevents de-lamination.
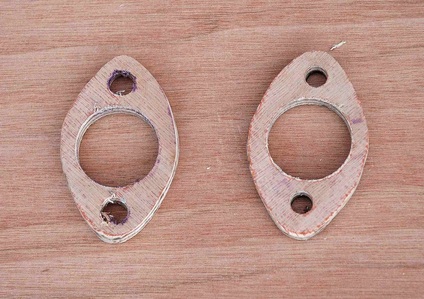
Having cut all of the holes the gasket material is removed and the ply is then cut to form two formers of gasket shape as shown in the picture. This seems a lot of trouble but I found it was one way to achieve a satisfactory finish for the outside edge of the gasket.
A typical piece of the material is illustrated and comprises an inner layer of soft heatproof fabric sandwiched between outer layers of thin perforated steel. The layers will separate quite easily as shown and this can cause problems when trying to make gaskets.
It is suggested that the material can easily be cut with tin snips and the holes drilled by clamping the material between thin wooden boards. I found that although this advice is true rather more care is needed to produce acceptable results. After several unsuccessful attempts I found the following method worked well.
1. Two plywood boards (I used 8mm) are initially cut to clamp the gasket material and bolted securely. The The old gasket is then used to trace an image onto the plywood. Care at this stage especially regarding the position and size of the holes will pay dividends.
The mounting holes can then be drilled. By sandwiching the gasket material between the ply the material is prevented from separating and clean holes are formed. Next the large port hole needs to be cut. I used a decent bi-metallic hole-saw in a battery drill, again the ply supports the material and prevents de-lamination.
Having cut all of the holes the gasket material is removed and the ply is then cut to form two formers of gasket shape as shown in the picture. This seems a lot of trouble but I found it was one way to achieve a satisfactory finish for the outside edge of the gasket.
|
|
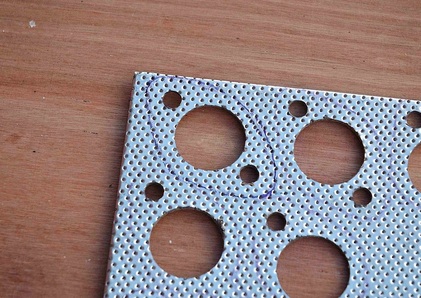
A rough outline of the gasket is now traced onto the material, a felt tip worked well. The picture shows several drilled gaskets as it is easy to make a few spares at this stage, note how clean the holes are. The gasket is then roughly cut to shape using tin snips and securely mounted between the two ply formers ( the illustration shows another type of gasket, part of the set required). While cutting to shape the limitations of using tin snips are readily apparent. The material tends to de-laminate all to easily and cutting accurately is most difficult.
|
|
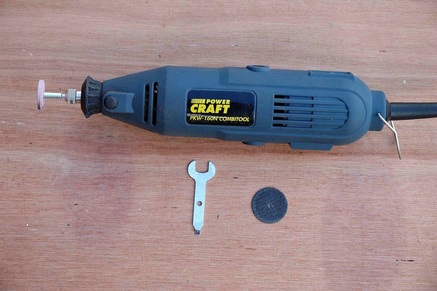
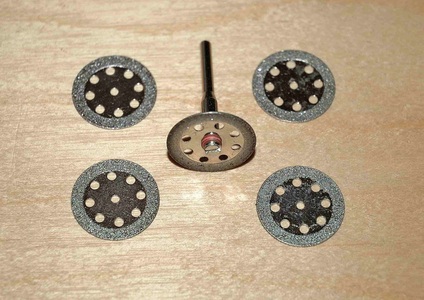
To tidy up the gasket I used a Dremel type tool although other more substantial tools such as a die grinder would no doubt be successful. Fibre-glass reinforced cutting discs were originally used to trim close to the ply formers and a pink grinding disc finished the edges. The grinding wheel wore very slowly and tidied all of the gaskets illustrated but I found one cutting disc was required for each gasket which was a bit costly. I then tried the miniature diamond cutters now freely available and these coped much better, a single diamond cutter would trim many gaskets. See illustration below.
As seen in the illustration, grinding the edge does tend to scorch the ply formers but this is of no consequence.
Sometimes there is a tendency for the outer steel to de-laminate slightly from the soft inner, I found that by clamping the offending edge securely in a vice that this was enough to fix it back. The steel sheet has barbs on its inner face so if these are not damaged it will with a bit of persuasion clamp back to the inner securely. While perhaps not quite to the standard of commercial items
(probably cut with a water jet) the finished gaskets are completely satisfactory to make a gas tight seal.
|
|
|
|
Suppliers:
Gasket material,
Bi-metallic hole-saws, Screwfix sell a decent quality budget set marketed as "Titan"
Cutting discs and grinding wheels, Original Dremel items were
found to last much longer